MySql server on Docker
Start up mysql server with remote root access:
docker run - name=mysql \
-e MYSQL_ROOT_HOST=% \
-e MYSQL_ROOT_PASSWORD =xxxx \
-p 3306:3306 \
-v /home/data/mysql:/var/lib/mysql \
-d mysql/mysql-serverStart up mysql server with remote root access:
docker run - name=mysql \
-e MYSQL_ROOT_HOST=% \
-e MYSQL_ROOT_PASSWORD =xxxx \
-p 3306:3306 \
-v /home/data/mysql:/var/lib/mysql \
-d mysql/mysql-serverRegex search on Postgres
# (all the codes are in flask-SqlAlchemy syntax)
Book.query.filter(Book.name.op('~')('AUD$')).first()lookup record under mac
nslookup google.com
dscacheutil -q host -a name google.com
Clear mac(big sur) dns cache
sudo dscacheutil -flushcache; sudo killall -HUP mDNSResponderclear ios dns cache
enter airplane mode for 15 secondsclear chrome dns cache
chrome://net-internals/#dnsclear safari dns cache (doesn’t work for me…)
developer menu -> Empty cache 遇到很诡异的问题,同样的 local domain 在 chrome 打得开,safari 打不开。弄了很久后,测试打开 DNSSEC 后 safari 就能用了
Router:
Local DNS Server:
QNAP supports containers using its own Container Station, which is great to get some containers up and running fairly quick, but …
That is why some people, like me, want to use another Docker GUI for managing the containers, one is Portainer. Using the Container Station, Portainer is quite simple to be installed, but I struggled getting Portainer talking to QNAPs docker implementation. After I have figured it out, it was straight forward, but for everyone else struggling – let me help out.
I assume that QNAPs Container Station is already installed and running, otherwise activate it in the App Store.
/data for it. This makes your configurations persistent.Portainer needs to talk to the Container Station docker implementation, this is done using TLS via specific port on your NAS IP. We need to make some adjustments in the background to make this work and export the certificates.
mkdir -pv ~/.dockercp /yourfolderwithfiles/ ~/.docker/export DOCKER_HOST=tcp://192.168.1.10:2376 DOCKER_TLS_VERIFY=1This is also described on the Docker Certificate site, slightly different but you should get the idea and the process.
Add the Container Station as an endpoint to Portainer
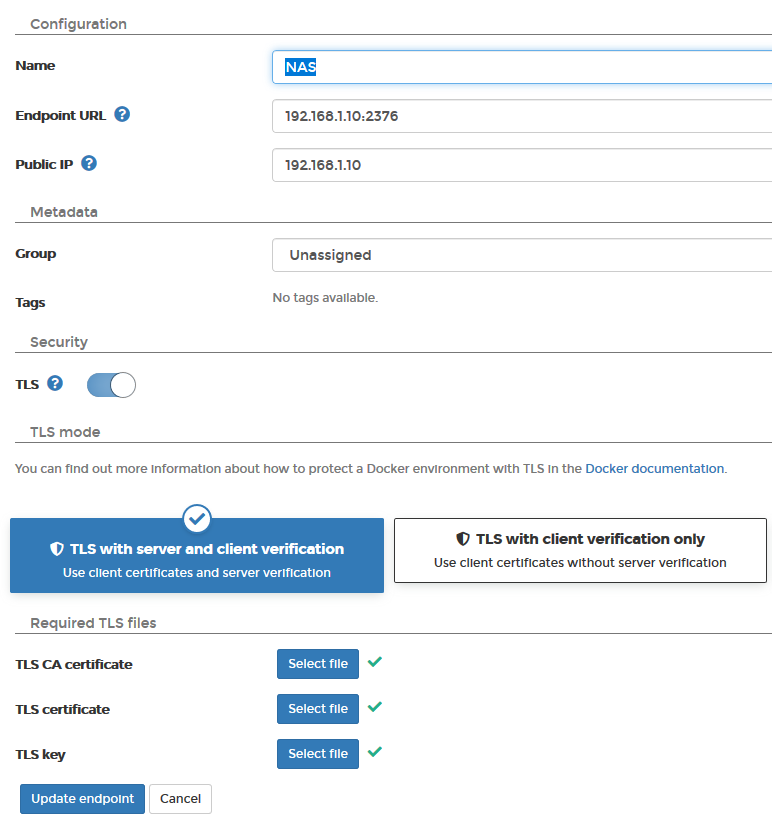
Adding the Container Station as an endpoint took some time to figure out, but it is easier then I thought at the end. First time logging in to Portainer you need to create an admin user. After that Portainer needs an endpoint to connect to.
Define a name
The endpoint URL is the one from the EXPORT command, like 192.168.1.10:2376 with the port included
Keep the public IP empty
Turn on TLS and choose TLS with server and client certificate
Now we need the certificates stored on the computer to be uploaded. Choose the files as stated below
TLS CA certificate == ca.pem
TLS certificate == cert.pem
TLS key == key.pem
Click Add endpoint

修改 systemd service 的环境变量,可以通过 sudo systemctl status <service_name> 来找到 service file path.
然后修改环境变量:
[Service]
Environment=PATH=:/usr/local/sbin:/usr/local/bin:/usr/sbin:/usr/bin:/sbin:/bin:
reload config 和重启 service
sudo systemctl daemon-reload
sudo systemctl restart 今天在 github 看到一个 project 用 certbot 来管理证书,试用了下感觉还蛮简单的。主要有:
/etc/cron.d/certbot, 在 root 下面自动运行。ps: Ubuntu Minimal 版本不带 cron, 所以要额外 sudo apt install cron
nginx:sudo apt update
sudo apt install -y nginx certbot python3-certbot-nginx/etc/nginx/sites-available/code-server with sudo:server {
listen 80;
listen [::]:80;
server_name mydomain.com;
location / {
proxy_pass http://localhost:8080/;
proxy_set_header Host $host;
proxy_set_header Upgrade $http_upgrade;
proxy_set_header Connection upgrade;
proxy_set_header Accept-Encoding gzip;
}
}Remember to replace mydomain.com with your domain name!
sudo ln -s ../sites-available/code-server /etc/nginx/sites-enabled/code-server
sudo certbot --non-interactive --redirect --agree-tos --nginx -d mydomain.com -m me@example.com
Make sure to substitute me@example.com with your actual email.
Visit https://<your-domain-name> to access code-server. Congratulations!
在 Oracle Cloud 安装了 mysql DB,从其他机器怎么都连接不上去。查了很久,一点点的确认下面几个层次的问题:
最复杂的是 iptables,机器安装后就已经一大串规则,我手动添加了开放 3306 端口后并没有效果。搞到我查了很久,以为哪里还有一层防火墙。
可以通过下面命令来清空所有规则:
sudo iptables -F

# 或者这个命令清空所有 groups
iptables-save | awk '/^[*]/ { print $1 }
                 /^:[A-Z]+ [^-]/ { print $1 " ACCEPT" ; }
                 /COMMIT/ { print $0; }' | iptables-restore
然后添加下面规则:
# add SSH port first
iptables -I INPUT -p tcp --dport 22 -j ACCEPT       # ssh
iptables -I INPUT -p tcp --dport 80 -j ACCEPT       # http
iptables -I INPUT -p tcp --dport 443 -j ACCEPT      # https
iptables -I INPUT -p tcp --dport 3306 -j ACCEPT     # mysql

# Set default chain policies
iptables -P INPUT DROP
iptables -P FORWARD DROP
iptables -P OUTPUT ACCEPT

# Accept on localhost
iptables -A INPUT -i lo -j ACCEPT
iptables -A OUTPUT -o lo -j ACCEPT

# Allow established sessions to receive traffic
iptables -A INPUT -m conntrack --ctstate ESTABLISHED,RELATED -j ACCEPT
最后切记要保存设置,要不然 reboot 设置会重置:
iptables-save > /etc/iptables/rules.v4联系阅读:
Oracle VM 开放 80/443 端口