Mac: You have mail.

  • Post category:技术

最近打开 iTerms 2 就会看到这样的一个提示:

Last login: Fri May 17 21:32:09 on ttys000
You have mail.

查了下发现原来 linux/unix-like 的系统用户,会有个 terminal 版的内部消息 mail 系统。 可以通过下面的命令去打开:

mail

打开的界面是纯文本列表,翻页、退出等操作按键和 vim 一样。我打开看了下自己收到的 mail,全部都是 crontab 的任务 log — 不管是成功还是失败的。

Crontab

原来 crontab 的任务 log,会默认 mail 给你的账户。如果要停止发送邮件,可以添加下面三行的任意一种到你的 crontab command 后面

> /dev/null
>/dev/null 2>&1
> /dev/null 2>&1 || true

最终的 crontab command看上去应该是这个样子:

0 1 5 10 * /path/to/script.sh > /dev/null
0 1 5 10 * /path/to/script.sh >/dev/null 2>&1
0 1 5 10 * /path/to/script.sh > /dev/null 2>&1 || true

mail 的存储位置

所有的 mail 信息都放置在 /var/mail/<username> 下面,除了用 mail 命令查看,你也可以直接 print 出所有 mail 的内容:

cat /var/mail/$(whoami)
less /var/mail/$(whoami)

也可以填入其他用户名字看他们的 mail

清空 mail

不知道为什么,删除自己的 mail 也要用 sudo

$ sudo rm /var/mail/$(whoami)
$ mail
No mail for <username>
Continue ReadingMac: You have mail.

how to set proxy server in ubuntu/linux

  • Post category:技术

For normal linux cmd

Set this two lines on your .bashrc

export HTTP_PROXY=http://proxy.company.com:8080
export HTTPS_PROXY=https://proxy.company.com:8080

For cmd running under sudo

if you have to run sudo apt-get install, you have to pass the proxy config to root/sudo account

Edit /etc/sudoers and append below line to the file:

Defaults env_keep = "http_proxy https_proxy ftp_proxy DISPLAY XAUTHORITY"
Continue Readinghow to set proxy server in ubuntu/linux

Oracle VM 开放 80/443 端口

  • Post category:技术

记录一下怎么配置 Oracle Cloud 的 VM 网络端口,感觉很不直观。端口开放需要同时开放 instance 内部防火墙和 Internet Gatway 的端口

开放 instance 内部 firewall 端口

Oracle 安装的 ubuntu 默认关闭了除 22 之外的全部端口,我倾向关闭 instance 的防火墙(开放全部端口)

sudo iptables -P INPUT ACCEPT
sudo iptables -P OUTPUT ACCEPT
sudo iptables -P FORWARD ACCEPT
sudo iptables -F

但也可以选择开放部分端口:

sudo apt install firewalld
sudo firewall-cmd --zone=public --permanent --add-port=80/tcp
sudo firewall-cmd --zone=public --permanent --add-port=443/tcp
sudo firewall-cmd --reload

开放 Internet Gatway 的端口

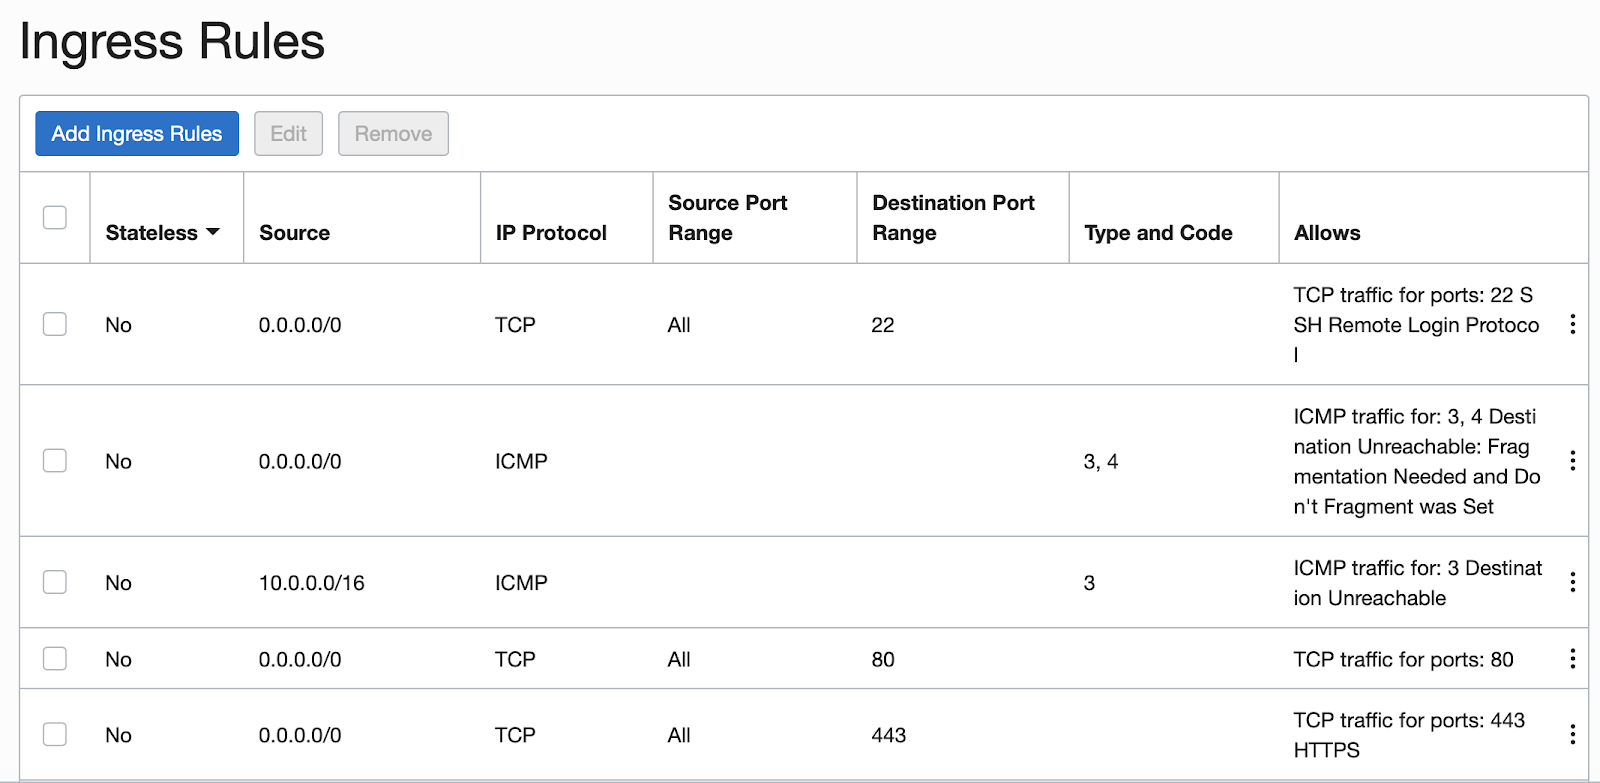
在 Virtual Cloud Network 下面,找到 default security list,添加两条 Ingress Rules 到 80,443 端口

Continue ReadingOracle VM 开放 80/443 端口

迁移 wordpress 图片到 Oracle Object Storage

  • Post category:技术

背景

最近才知道 Oracle Cloud 的 Always Free 政策,作为云服务的后来者,为吸引用户,这算很拼的了。

Oracle Cloud Always Free
Services you can use for an unlimited time.

  • Compute – 2 VM.Standard.E2.1.Micro 1GB RAM
  • Databases – 2 DBs, 20 GB each
  • Load balancer – 1 instance with 10 Mbps
  • Block Volume – 2 volumes, 100 GB total (used for compute)
  • Object Storage – 10 GB
  • Bandwidth – 10TB egress per month
  • Notifications – 1 million delivery options per month, 1000 emails sent per month
  • Full, detailed list – https://www.oracle.com/cloud/free/

终身免费得到两台 VM 和两台 DB,非常赞了。对刚入门玩 VPS 的用户,也是很够用了。可惜我前阵子刚续费了 AWS EC2,这两台 VM 以后再看别的用途吧。

今天重点看下 AWS S3 的替代品 — Oracle Object Storage。我在 S3 放置网站的 static files,主要是用户上传的 Media 资源,并不算多,也就 2-3 个 G。而 S3 的费用主要有两部分:存储费和流量费。如果转去 Oracle 的话,有 10G 的免费存储,和 10TB 每个月的流量。 我至少一年内都不用花这部分的钱了。

恰好我用的 S3-Uploads 插件支持改 API 到 S3 compatible provider, 所以花时间重新 upload 了一遍到 Oracle。

配置 Oracle Object Storage

因为步骤和 S3 差不多,所以简单描述下:

  1. 创建新的 IAM user
  2. 创建新的 user group, 把前面的 user 加入 group
  3. 创建新的 compartment,这也是资源分组的概念。
  4. 创建新的 Object Storage bucket,
    • 设置到前面的 compartment 组
    • 别忘了设置 public
  5. 创建 policy,允许 group 的人访问 bucket。自己替换成你设置的组名。
    Allow group <group_name> to manage buckets in compartment <compartment_name>
    Allow group <group_name> to manage objects in compartment <compartment_name>
  6. 回到 user 页面,在下面选择 Customer Secret Keys 就可以创建和 S3 相兼容的 key 和 secret 了。创建完后的弹窗复制 secret,回到外面表格复制 key。
  7. 回到 bucket 页面,找到你的 bucket name 和 namespace
  8. 这里找到你的 region code 代码

安装 S3-Uploads

在 wordpress 主目录下面执行

composer require humanmade/s3-uploads

添加 这一行到 wp-config.php 加载 wp_setting.php 之前

require_once __DIR__ . '/vendor/autoload.php';

激活插件:

wp plugin activate S3-Uploads

配置 S3-Uploads 到 Oracle

  1. 创建一个新文件 wp-content/mu-plugins/s3-endpoint.php , 加入下面内容。其中需要填入 namespace 和 region code。
<?php
// Filter S3 Uploads params.
add_filter( 's3_uploads_s3_client_params', function ( $params ) {
        $params['endpoint'] = 'https://<bucket_namespace>.compat.objectstorage.<region_code>.oraclecloud.com';
        $params['use_path_style_endpoint'] = true;
        $params['debug'] = false; // Set to true if uploads are failing.
        return $params;
} );
  1. wp-config.php 加入下面配置, 填入上面获得的信息。
define( 'S3_UPLOADS_BUCKET', '' );
define( 'S3_UPLOADS_REGION', '' ); 
define( 'S3_UPLOADS_KEY', '' );
define( 'S3_UPLOADS_SECRET', '' );
define( 'S3_UPLOADS_BUCKET_URL', 'https://objectstorage.<region_code>.oraclecloud.com/n/<namespace>/b/<bucket_name>/o' );

测试并上传

在 wordpress 主目录输入:wp s3-uploads verify 插件会尝试上传一个测试文件,并且删除掉。看到以下信息就证明成功啦:

$ wp s3-uploads verify
Attempting to upload file s3:///uploads/643041837.txt
File uploaded to S3 successfully.
Attempting to delete file. s3:///uploads/643041837.txt
File deleted from S3 successfully.

然后我们就可以把所有 uploads 搬去 Oracle:

wp s3-uploads upload-directory wp-content/uploads uploads

结束!回到你的 wordpress 看看吧
Continue Reading迁移 wordpress 图片到 Oracle Object Storage

两步安装 SSL 证书

  • Post category:技术

前言

之前一直以为商用 SSL 证书是要花钱买的, 原来 Let’s Encrypt 是可以免费领取的. 当然免费的东西只有 90 天有效期, 网上有很多工具帮助你自动续期.

Let’s Encrypt is a non-profit certificate authority run by Internet Security Research Group (ISRG) that provides X. 509 certificates for Transport Layer Security (TLS) encryption at no charge. The certificate is valid for 90 days, during which renewal can take place at any time.

我找到的这个工具叫 acme.sh, 简单的bash 脚本, 不需要额外安装。

安装 acme.sh

使用也还蛮简单, 就申请证书, 安装两步。 注意生成的证书得放在 nginx 目录下面

# download acme.sh
curl https://get.acme.sh | sh

# issue certificate
acme.sh --issue -d example.com -w /var/www/.letsencrypt

# install
acme.sh --install-cert -d example.com \
--key-file       /etc/nginx/ssl/site.key  \
--fullchain-file /etc/nginx/ssl/site.cert \
--reloadcmd     "sudo service nginx reload"

update Nginx 配置

server {
        listen 443 ssl;
        ... 

        ssl_certificate /etc/nginx/ssl/site.cert;
        ssl_certificate_key /etc/nginx/ssl/site.key;
        ssl_protocols TLSv1 TLSv1.1 TLSv1.2; # do not use SSLv3 ref: POODLE
}
server {
    listen 80;
    root /var/www/.letsencrypt/;
    index index.html;

    location / {
            rewrite ^/(.*)$ https://$host$request_uri permanent;
    }

    location ^~ /.well-known/ {
            try_files $uri $uri/ =404;
    }
}

SSL 证书续期

在 install 的时候在 crontab 会自动加上一个 daily job, 每天半夜检查更新证书

30 0 * * * "/home/user/.acme.sh"/acme.sh --cron --home "/home/user/.acme.sh" > /dev/null

Continue Reading两步安装 SSL 证书